回答としては,このお魚は”幅を持たない”形状をしています.二次元です。
さて,大量の未整列な多視点画像からの三次元形状復元ついでにカメラの内外部パラメータの推定まで一気にしちゃう手法のことをStructure from Motion(SfM)と言い,結構長いこと研究されているホットな話題であります.
そんなSfMを行うためのツールにBundlerがあります.r○byのbundlerとは全く関係ありません.
Bundlerは局所特徴量を用いたsparseな画像間対応からSfMをするもので,一般的にはSIFTが使われていますが,対応付けは独立プログラムに委譲されてるので,うまくやればどんな局所特徴量でもSfMをお楽しみいただける設計になっています.
ということで,Computer Vision Advent Calendar 2012で書いたさかな前線 » ECCV2012で発表されたKAZE局所特徴量を試してみたの続きという事で,KAZE特徴量を用いたBundlerでのSfMを試してみました.実用的な例がほしかったのでw
CVAdventCalendarの@yasutomo57jpさんの記事の二番煎じです…
Bundler(やPMVS)のアルゴリズムについては他に譲ります(←
※結論から言うとやり方がまずいのでto be continuedです…
BundlerでSfMをする準備
基本的には私の研究開発ツール(第46回) – Bundler: Structure from Motion for Unordered Image CollectionsとNAL研卒業研究ノート:: bundlerを動かしてみるを参考にしています.
32bit版のLinuxを想定しています.64bit版ではbundlerがクラッシュします.
※@ton1517さんの情報によると64bitでも動かせるとのことで,ちょっと調べてみます.手元の環境では無理でした(´・ω・`)
Bundlerの環境構築
% wget http://phototour.cs.washington.edu/bundler/distr/bundler-v0.4-source.tar.gz
% tar xf tar xf bundler-v0.4-source.tar.gz
% cd bundler-v0.4-source
% export BUNDLER_PATH=$PWD
% export BUNDLER_BIN_PATH=$BUNDLER_PATH/bin
#こっからSIFTの導入
% cd ..
% unzip siftDemoV4.zip
% cp siftDemoV4/sift bundler-v0.4-source/bin/
#Bundlerのビルド
% cd BUNDLER_PATH
% sudo apt-get install ImageMagick zlib1g-dev libjpeg-dev gfortran liblapack-dev libblas-dev
% make
% export LD_LIBRARY_PATH=$LD_LIBRARY_PATH:$BUNDLER_PATH/lib
% sudo apt-get install meshlab   #SfMの結果の点群(plyファイル)のビューワ
なお,makeのとき,
BundlerApp.h: コンストラクタ ‘SkeletalApp::SkeletalApp()’ 内:
BundlerApp.h:620:32: エラー: コンストラクタ ‘SkeletalApp::BundlerApp’ を直接呼び出すことは出来ません [-fpermissive]
BundlerApp.h:620:32: エラー:   for a function-style cast, remove the redundant ‘::BundlerApp’ [-fpermissive]
というエラーが出るかも知れません.サブクラスのデフォルトコンストラクタの先頭で親クラスのデフォルトコンストラクタを明示的に呼ぶという謎(無意味)なことをしてるだけなので,src/BundlerApp.hの620行目を消してしまってからもっかいmakeしてみてください.
他にも必要なライブラリがないエラーが出たら適宜入れてください.apt-fileを使って探すといいです.
PMVSの環境構築
BundlerでSfMして得られる三次元点群は結構疎な(スカスカな)ものとなりますが,これを元により密な点群を推定するPatch-based Multi-View Stereo(PMVS)をかけることができます.
代表的な実装としてgoogle?の古川先生のPMVS2があります.
古川さんと言えばECCV2012のbest student paper awardの共著で入ってましたね.
まず事前準備.必要なライブラリをいろいろ入れます.
% sudo apt-get install libboost-all-dev libgsl0-dev libf2c2-dev libxext-dev
% wget http://www.netlib.org/clapack/clapack.tgz
% tar xf clapack.tgz
% cd CLAPACK-3.2.1
% cp make.inc.example make.inc
% make      #けっこう時間かかります
% sudo cp lapack_LINUX.a /usr/local/lib/libclapack_LINUX.a
% sudo cp tmglib_LINUX.a /usr/local/lib/libctmglib_LINUX.a
% sudo cp F2CLIBS/libf2c.a /usr/local/lib
% sudo mkdir /usr/local/include/clapack
% sudo cp INCLUDE/*.h /usr/local/include/clapack
% sudo chmod 644 /usr/local/include/clapack/*
PMVS2のサイトからpmvs-2-fix0.tar.gzをダウンロードしてきます.314MB…すごく…大きいです….サンプルデータも含まれてますのでね.
そして,
% tar xf pmvs-2-fix0.tar.gz
% cd pmvs-2/program/main
% make
% export PMVS2_BIN=$PWD
これでPMVS2の導入ができました.
まずはふつうにSIFTなBundlerを試してみましょう
まずはちゃんとSfMできるか,あと復元形状を見てテンション上げるために,Bundlerとよく組み合わされるSIFTを使ってみます.
SfMしたい物体の写真をたくさん撮影します
物体(もちろん剛体)を,なるべく多くの視点から撮影しましょう.
SIFTで対応付ける性質上,テクスチャが多いランバート面のほうがよいでしょう.
僕が撮影してみた画像のサムネイルはこんなかんじ.はい.自宅です.おさかなさんのマイホームΣ(゚∀゚ノ)ノキャー
ちなみにこういうthmunailはImageMagickのmontageコマンドで一発生成できます.

画像データが欲しい方は,この画像をzipに固めました.
で,こうして撮影された画像を
$BUNDLER_PATH/images
に保存しているものとします.
画像ディレクトリをカレントとしてbundlerを走らせるだけなので保存場所はどこでもいいんですが,ディレクトリの中にその画像群だけがある状態にしてください.
以下ずっと,画像をこの配置にしている前提で話を進めて参ります.
画像を縮小します
普通のデジカメで撮影てしまうと,画像がデカすぎになってしまします.高解像度なら高精細な形状が復元できる,なんてことはないので,XGAやVGAあたりに縮小します.
あるいは撮影時のカメラ設定で最初から解像度低めにするのでもOKです.その場合はここの作業は必要ありません.
縮小ツールには何を使ってもいいのですが,EXIFを落とさないようなツールを使ってください.
EXIFに含まれる焦点距離情報や素子情報はSfMの精度に大きく影響を与えます.
ここではImageMagickに含まれる一括変換プログラムmogrifyを使いましょう.
jheadというツールでEXIFが落ちてないことを確認できます.
% cd
% mogrify -resize 800x600 *.jpg
% jhead 01.jpg
File name    : 01.jpg
File size    : 173765 bytes
File date    : 2012:12:09 04:53:31
Camera make  : FUJIFILM
Camera model : FinePix F100fd
Date/Time    : 2012:12:09 04:06:05
Resolution   : 800 x 600
Flash used   : No
Focal length :  6.4mm  (35mm equivalent: 29mm)
CCD width    : 7.97mm
Exposure time: 0.167 s  (1/6)
Aperture     : f/3.3
ISO equiv.   : 400
Whitebalance : Auto
Metering Mode: pattern
Exposure     : program (auto)
Bundlerを走らせます
画像のあるディレクトリに行って,
% $BUNDLER_PATH/RunBundler.sh
を実行します.
実行結果の標準出力は例えば次のようになります.※クリックで開きます.長いです.
% ../RunBundler.sh
0
Image list is list_tmp.txt
[Extracting exif tags from image ./DSCF0388.jpg]
  [Focal length = 6.400mm]
[Couldn't find CCD width for camera FUJIFILM FinePix F100fd]
[Found in EXIF tags]
  [CCD width = 7.970mm]
  [Resolution = 800 x 600]
  [Focal length (pixels) = 642.409
[Extracting exif tags from image ./DSCF0389.jpg]
  [Focal length = 6.400mm]
[Couldn't find CCD width for camera FUJIFILM FinePix F100fd]
[Found in EXIF tags]
  [CCD width = 7.970mm]
  [Resolution = 800 x 600]
  [Focal length (pixels) = 642.409
[Extracting exif tags from image ./DSCF0390.jpg]
  [Focal length = 6.400mm]
[Couldn't find CCD width for camera FUJIFILM FinePix F100fd]
[Found in EXIF tags]
  [CCD width = 7.970mm]
  [Resolution = 800 x 600]
  [Focal length (pixels) = 642.409
[Extracting exif tags from image ./DSCF0391.jpg]
  [Focal length = 6.400mm]
[Couldn't find CCD width for camera FUJIFILM FinePix F100fd]
[Found in EXIF tags]
  [CCD width = 7.970mm]
  [Resolution = 800 x 600]
  [Focal length (pixels) = 642.409
[Extracting exif tags from image ./DSCF0392.jpg]
  [Focal length = 6.400mm]
[Couldn't find CCD width for camera FUJIFILM FinePix F100fd]
[Found in EXIF tags]
  [CCD width = 7.970mm]
  [Resolution = 800 x 600]
  [Focal length (pixels) = 642.409
[Extracting exif tags from image ./DSCF0393.jpg]
  [Focal length = 6.400mm]
[Couldn't find CCD width for camera FUJIFILM FinePix F100fd]
[Found in EXIF tags]
  [CCD width = 7.970mm]
  [Resolution = 800 x 600]
  [Focal length (pixels) = 642.409
[Extracting exif tags from image ./DSCF0394.jpg]
^[^K  [Focal length = 6.400mm]
[Couldn't find CCD width for camera FUJIFILM FinePix F100fd]
[Found in EXIF tags]
  [CCD width = 7.970mm]
  [Resolution = 800 x 600]
  [Focal length (pixels) = 642.409
[Extracting exif tags from image ./DSCF0395.jpg]
  [Focal length = 6.400mm]
[Couldn't find CCD width for camera FUJIFILM FinePix F100fd]
[Found in EXIF tags]
  [CCD width = 7.970mm]
  [Resolution = 800 x 600]
  [Focal length (pixels) = 642.409
[Extracting exif tags from image ./DSCF0396.jpg]
  [Focal length = 6.400mm]
[Couldn't find CCD width for camera FUJIFILM FinePix F100fd]
[Found in EXIF tags]
  [CCD width = 7.970mm]
  [Resolution = 800 x 600]
  [Focal length (pixels) = 642.409
[Extracting exif tags from image ./DSCF0397.jpg]
  [Focal length = 6.400mm]
[Couldn't find CCD width for camera FUJIFILM FinePix F100fd]
[Found in EXIF tags]
  [CCD width = 7.970mm]
  [Resolution = 800 x 600]
  [Focal length (pixels) = 642.409
[Extracting exif tags from image ./DSCF0398.jpg]
  [Focal length = 6.400mm]
[Couldn't find CCD width for camera FUJIFILM FinePix F100fd]
[Found in EXIF tags]
  [CCD width = 7.970mm]
  [Resolution = 800 x 600]
  [Focal length (pixels) = 642.409
[Extracting exif tags from image ./DSCF0399.jpg]
  [Focal length = 6.400mm]
[Couldn't find CCD width for camera FUJIFILM FinePix F100fd]
[Found in EXIF tags]
  [CCD width = 7.970mm]
  [Resolution = 800 x 600]
  [Focal length (pixels) = 642.409
[Extracting exif tags from image ./DSCF0400.jpg]
  [Focal length = 6.400mm]
[Couldn't find CCD width for camera FUJIFILM FinePix F100fd]
[Found in EXIF tags]
  [CCD width = 7.970mm]
  [Resolution = 800 x 600]
  [Focal length (pixels) = 642.409
[Extracting exif tags from image ./DSCF0401.jpg]
  [Focal length = 6.400mm]
[Couldn't find CCD width for camera FUJIFILM FinePix F100fd]
[Found in EXIF tags]
  [CCD width = 7.970mm]
  [Resolution = 800 x 600]
  [Focal length (pixels) = 642.409
[Extracting exif tags from image ./DSCF0402.jpg]
  [Focal length = 6.400mm]
[Couldn't find CCD width for camera FUJIFILM FinePix F100fd]
[Found in EXIF tags]
  [CCD width = 7.970mm]
  [Resolution = 800 x 600]
  [Focal length (pixels) = 642.409
[Extracting exif tags from image ./DSCF0403.jpg]
  [Focal length = 6.400mm]
[Couldn't find CCD width for camera FUJIFILM FinePix F100fd]
[Found in EXIF tags]
  [CCD width = 7.970mm]
  [Resolution = 800 x 600]
  [Focal length (pixels) = 642.409
[Extracting exif tags from image ./DSCF0404.jpg]
  [Focal length = 6.400mm]
[Couldn't find CCD width for camera FUJIFILM FinePix F100fd]
[Found in EXIF tags]
  [CCD width = 7.970mm]
  [Resolution = 800 x 600]
  [Focal length (pixels) = 642.409
[Extracting exif tags from image ./DSCF0405.jpg]
  [Focal length = 6.400mm]
[Couldn't find CCD width for camera FUJIFILM FinePix F100fd]
[Found in EXIF tags]
  [CCD width = 7.970mm]
  [Resolution = 800 x 600]
  [Focal length (pixels) = 642.409
[Extracting exif tags from image ./DSCF0406.jpg]
  [Focal length = 6.400mm]
[Couldn't find CCD width for camera FUJIFILM FinePix F100fd]
[Found in EXIF tags]
  [CCD width = 7.970mm]
  [Resolution = 800 x 600]
  [Focal length (pixels) = 642.409
[Found 19 good images]
[- Extracting keypoints -]
Finding keypoints...
2071 keypoints found.
Finding keypoints...
2370 keypoints found.
Finding keypoints...
2433 keypoints found.
Finding keypoints...
2181 keypoints found.
Finding keypoints...
2340 keypoints found.
Finding keypoints...
2175 keypoints found.
Finding keypoints...
1951 keypoints found.
Finding keypoints...
2104 keypoints found.
Finding keypoints...
1879 keypoints found.
Finding keypoints...
1562 keypoints found.
Finding keypoints...
1905 keypoints found.
Finding keypoints...
1723 keypoints found.
Finding keypoints...
1214 keypoints found.
Finding keypoints...
3312 keypoints found.
Finding keypoints...
2959 keypoints found.
Finding keypoints...
2885 keypoints found.
Finding keypoints...
2551 keypoints found.
Finding keypoints...
3977 keypoints found.
Finding keypoints...
1226 keypoints found.
[- Matching keypoints (this can take a while) -]
../bin/KeyMatchFull list_keys.txt matches.init.txt
[KeyMatchFull] Reading keys took 0.610s
[KeyMatchFull] Matching to image 0
[KeyMatchFull] Matching took 0.010s
[KeyMatchFull] Matching to image 1
[KeyMatchFull] Matching took 0.080s
[KeyMatchFull] Matching to image 2
[KeyMatchFull] Matching took 0.180s
[KeyMatchFull] Matching to image 3
[KeyMatchFull] Matching took 0.270s
[KeyMatchFull] Matching to image 4
[KeyMatchFull] Matching took 0.360s
[KeyMatchFull] Matching to image 5
[KeyMatchFull] Matching took 0.460s
[KeyMatchFull] Matching to image 6
[KeyMatchFull] Matching took 0.540s
[KeyMatchFull] Matching to image 7
[KeyMatchFull] Matching took 0.630s
[KeyMatchFull] Matching to image 8
[KeyMatchFull] Matching took 0.730s
[KeyMatchFull] Matching to image 9
[KeyMatchFull] Matching took 0.800s
[KeyMatchFull] Matching to image 10
[KeyMatchFull] Matching took 0.870s
[KeyMatchFull] Matching to image 11
[KeyMatchFull] Matching took 0.940s
[KeyMatchFull] Matching to image 12
[KeyMatchFull] Matching took 1.050s
[KeyMatchFull] Matching to image 13
[KeyMatchFull] Matching took 1.080s
[KeyMatchFull] Matching to image 14
[KeyMatchFull] Matching took 1.290s
[KeyMatchFull] Matching to image 15
[KeyMatchFull] Matching took 1.410s
[KeyMatchFull] Matching to image 16
[KeyMatchFull] Matching took 1.510s
[KeyMatchFull] Matching to image 17
[KeyMatchFull] Matching took 1.660s
[KeyMatchFull] Matching to image 18
[KeyMatchFull] Matching took 1.720s
[- Running Bundler -]
[- Done -]
私の手元の環境では40秒くらいかかりました(Core i5 3570, SSD).
画像によっては失敗することもけっこうあるので,撮影条件を見直すか私の上げた画像を使ってみてください.
ひとまず結果を見てみよう
ということで現時点での復元形状をMeshLabで見てみましょう.
結果は画像ディレクトリに作られたbundleディレクトリに入っています.
% cd bundle
% ls
bundle.init.out  bundle_004.out  bundle_016.out  out            points007.ply  points017.ply
bundle.out       bundle_007.out  bundle_017.out  points001.ply  points010.ply  points019.ply
bundle_001.out   bundle_010.out  bundle_019.out  points003.ply  points014.ply  points020.ply
bundle_003.out   bundle_014.out  bundle_020.out  points004.ply  points016.ply
% meshlab points003.ply
plyファイルが復元された点群です.
bundlerでは最初にカメラパラメータとか推定してそこにだんだんくっつけていく形になってるので,数字が大きくなるほど点群が密になっています.
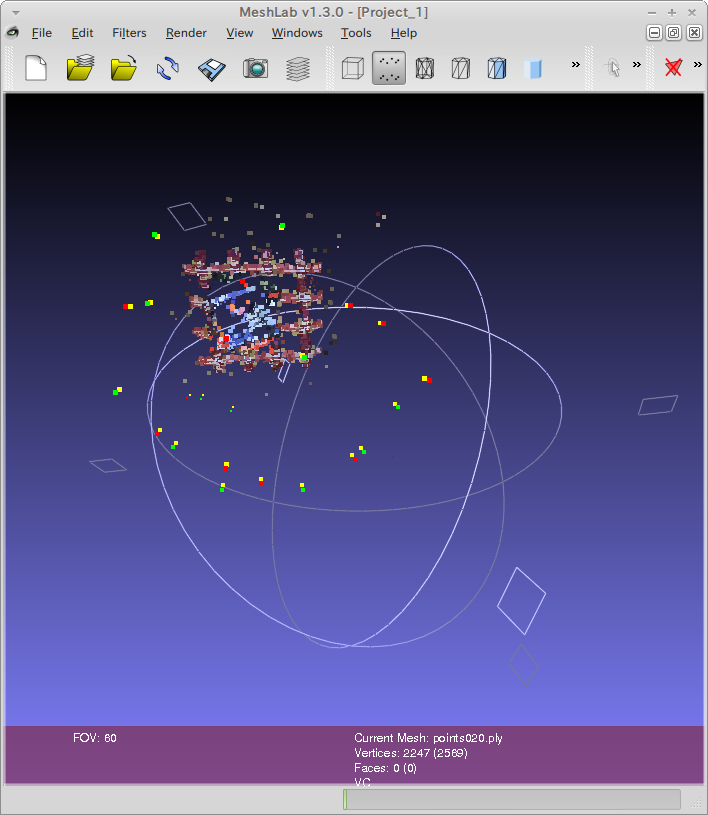
MeshLab上では,黄緑の点が光学中心(=カメラの場所)で,黄色い点が焦点で表示されます.
また,復元形状の点群の色は画像上の対応する点から引っ張ってくるので,見た目の色と一緒になります.
こちらがpoints020.plyです.わりときれいじゃないすか?
ただまだちょっと点群が荒いので,PMVSで綺麗にします.
PMVS2による点群密度の改善
画像ディレクトリに行って(bundleに入ってたら,いっこ上に戻って),
% $BUNDLER_BIN_PATH/Bundle2PMVS list.txt bundle/bundle.out
% vim pmvs/prep_pmvs.sh
prep_pmvs.shを編集して,4行目,このハイライトの行を消します(BUNDLER_BIN_PATHは最初に設定したので).
# Script for preparing images and calibration data
#   for Yasutaka Furukawa's PMVS system

BUNDLER_BIN_PATH= # Edit this line before running
if [ "$BUNDLER_BIN_PATH" == "" ] ; then echo Please edit prep_pmvs.sh to specify the path to the  bundler binaries.; exit; fi
# Apply radial undistortion to the images
$BUNDLER_BIN_PATH/RadialUndistort list.txt bundle/bundle.out pmvs
で,これをpmvsにかけるだけです.ここも数十秒かかりました.
% sh pmvs/prep_pmvs.sh
% cd pmvs
% $PMVS2_BIN/pmvs2 ./ pmvs_options.txt
※pmvs2に渡す最初の引数はディレクトリなんですが,スラッシュが最後についてないと失敗しますので注意してください.
こちらも一応,標準出力の手元での例を載せときましょう.
% $PMVS2_BIN/pmvs2 ./ pmvs_options.txt
 --------------------------------------------------
 --- Summary of specified options ---
# of timages: 20 (range specification)
# of oimages: 0 (not used)
level: 1  csize: 2
threshold: 0.7  wsize: 7
minImageNum: 3  CPU: 8
useVisData: 1  sequence: -1
 --------------------------------------------------
Reading images: ********************
1 5 2 3 0 4 Harris running ...Harris running ...Harris running ...6 7 Harris running ...Harris running ...Harris running ...Harris running ...Harris running ...195 harris done
DoG running...190 harris done
DoG running...171 harris done
DoG running...316 dog done
8 Harris running ...318 dog done
9 Harris running ...193 harris done
DoG running...191 harris done
DoG running...184 harris done178 harris done
DoG running...193 harris done
DoG running...179 harris done
DoG running...
179 harris done
DoG running...DoG running...319 dog done
10 Harris running ...318182 harris done
318 dog done
DoG running...314 dog done
12 Harris running ...315 dog done
319 dog done
11 13 14 Harris running ...320 dog done
15 Harris running ... dog done
Harris running ...16 Harris running ...Harris running ...318 dog done
17 Harris running ...184 harris done
DoG running...172 harris done
DoG running...318 dog done
18 Harris running ...186 harris done
DoG running...172 harris done
DoG running...198 harris done
DoG running...178 harris done
157DoG running... harris done
316 dog done
19 Harris running ...205 harris done
DoG running...DoG running...319 dog done
318 dog done
316 dog done
317 dog done
314 dog done
315 dog done
180 harris done
DoG running...318 dog done
316 dog done
done
adding seeds
(14,57)(6,6)(15,84)(16,41)(7,8)(1,72)(11,69)(10,74)(2,4)((9,25)19,18)(0,1)(18,0)(8,0)(5,3)(13,5)(4,86)(17,68)(12,8)(3,37)done
 ---- Initial: 0 secs ----
Total pass fail0 fail1 refinepatch: 12959 905 11361 693 1598
Total pass fail0 fail1 refinepatch: 100 6.98356 87.6688 5.34763 12.3312
Expanding patches...
 ---- EXPANSION: 22 secs ----
Total pass fail0 fail1 refinepatch: 22295 20197 797 1301 21498
Total pass fail0 fail1 refinepatch: 100 90.5898 3.57479 5.83539 96.4252
FilterOutside
mainbody:
Gain (ave/var): 1.72369 1.4636
20849 -> 20774 (99.6403%)       0 secs
Filter Exact: ********************
20774 -> 20486 (98.6137%)       0 secs
FilterNeighbor: 20486 -> 20242 (98.8089%)       0 secs
FilterGroups:   20
20242 -> 20056 (99.0811%)       0 secs
STATUS: 20 0 23076 0 0 0 0 0 0 0
0 0 0 0 0 0 0 0 0 0
0 0 0 0 0 0 0 0 0 0
0 0 0 0 0
Expanding patches...
 ---- EXPANSION: 1 secs ----
Total pass fail0 fail1 refinepatch: 1650 1011 261 378 1389
Total pass fail0 fail1 refinepatch: 100 61.2727 15.8182 22.9091 84.1818
FilterOutside
mainbody:
Gain (ave/var): 2.12117 1.6888
21067 -> 21064 (99.9858%)       0 secs
Filter Exact: ********************
21064 -> 20935 (99.3876%)       0 secs
FilterNeighbor: 20935 -> 20905 (99.8567%)       0 secs
FilterGroups:   20
20905 -> 20808 (99.536%)        0 secs
STATUS: 24 0 24461 0 0 0 0 0 0 0
0 0 0 0 0 0 0 0 0 0
0 0 0 0 0 0 0 0 0 0
0 0 0 0 0
Expanding patches...
 ---- EXPANSION: 1 secs ----
Total pass fail0 fail1 refinepatch: 667 410 138 119 529
Total pass fail0 fail1 refinepatch: 100 61.4693 20.6897 17.8411 79.3103
FilterOutside
mainbody:
Gain (ave/var): 2.52173 1.9171
21218 -> 21217 (99.9953%)       0 secs
Filter Exact: ********************
21217 -> 21130 (99.59%) 0 secs
FilterNeighbor: 21130 -> 21113 (99.9195%)       0 secs
FilterGroups:   20
21113 -> 21041 (99.659%)        0 secs
STATUS: 26 0 24988 0 0 0 0 0 0 0
0 0 0 0 0 0 0 0 0 0
0 0 0 0 0 0 0 0 0 0
0 0 0 0 0
 ---- Total: 0 secs ----
最終的な復元形状を見てみましょう
ここまでで密に推定された三次元点群が得られたので,meshlabで見てみましょう.
% cd models
% meshlab pmvs_options.txt.ply
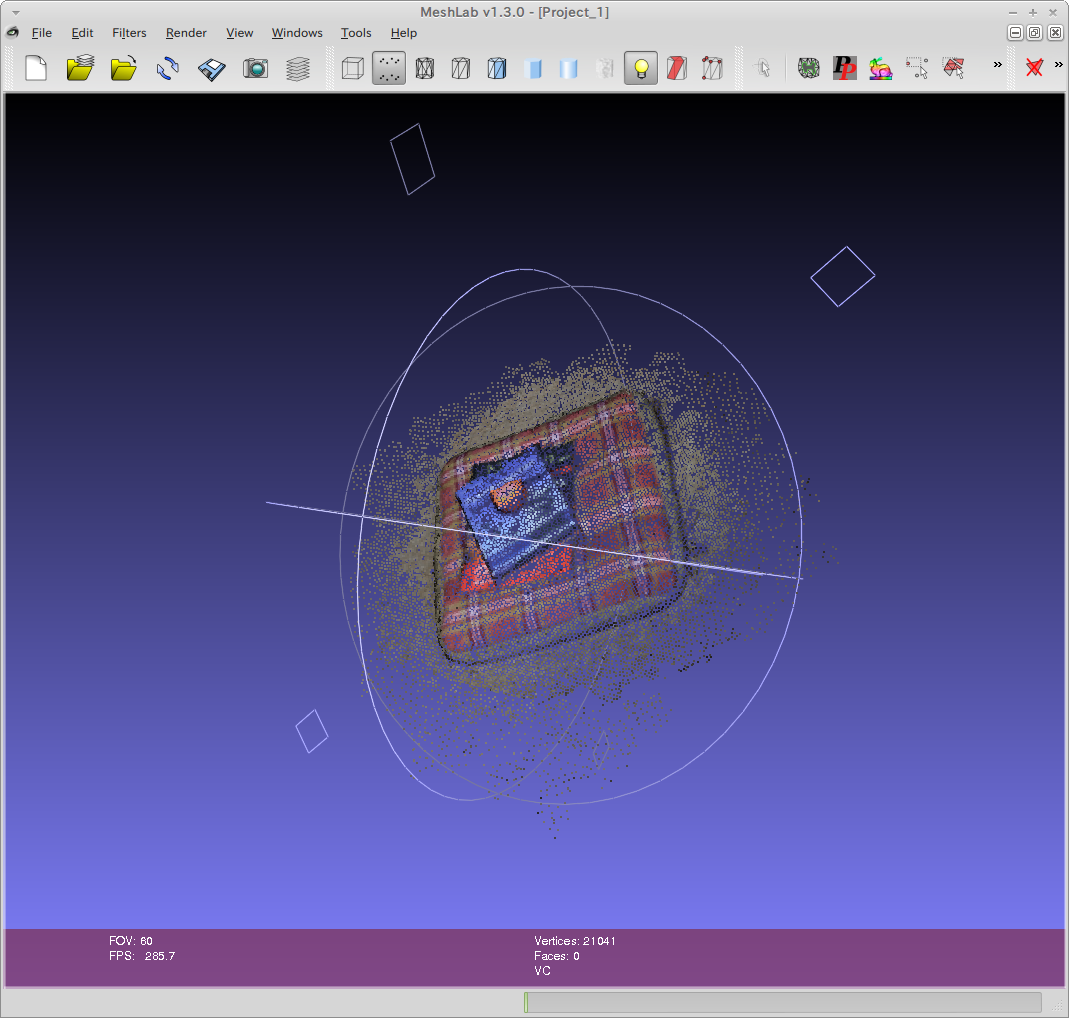
その時のスクショがこれです.どうですか?めちゃくちゃ綺麗じゃないですか?
本題,KAZE特徴量でやってみましょう
さてようやく本題に入れました.すでにSIFTでかなり綺麗にできててテンションは相当上がってもういいやって感じになってるかも知れませんがここはやっちゃいます.
やることは,Bundlerで使っているLoweによるSIFTデモと全く同じ形式での入出力を行うKAZE特徴抽出プログラムを書けばよいです.
なお対応付けと誤対応除去はBundlerに入っているので,本当に特徴量をファイルに書きだすだけのプログラムで大丈夫です.
LoweのSIFTデモプログラムの入出力形式
このプログラムの入力は,PGM形式の画像を標準入力から与えます.
出力は次のような形式です.
まず,ヘッダとして先頭の1行に次の値を持ちます.
NUMBER_OF_KEYPOINTS DIMENSION_OF_DESCRIPTOR
続いて,NUMBER_OF_KEYPOINTS回分だけ特徴量の情報を繰り返し記述します.
各特徴量の情報は
X Y SCALE ORIENTATION
DATA(0) DATA(1) DATA(2) DATA(3) ... DATA(19)
DATA(20) ... DATA(39)
...
... DATA(DIMENSION_OF_DESCRIPTOR-1)
という形で出力されます.20個数字を出す度に改行ですね.
このようなフォーマットで,標準出力に書き出します.
スケールやオリエンテーションは使われないので何が入っててもいいのですが,一応KAZEで算出されるScaleとAngleを入れてそれっぽくしておきます.
標準の対応付けプログラムをそのまま使う場合は,
- 特徴量の値はLoweのSIFTデモでは8bit整数になっているので,KAZEの特徴量の値も-1〜+1を0〜255になるよう線形変換してます
- DIMENSION_OF_DESCRIPTORの値は128です.KAZEは64次元なので,残りは0で埋めてしまいます(←
ということに注意してください
KAZE特徴量を使った同様のプログラムの作成
KAZE特徴量出力プログラムは上述のフォーマットのプログラムなので,特徴記述した結果を出力するだけです.
KAZE特徴量のプログラムの使い方については先日の記事を参考にしてください.
解説は不要ですかね.
これをコンパイルしたプログラムを,”sift”というファイル名にして,bundler-v0.4-source/binに入れます.要はSIFTのプログラムを完全に偽装してしまいます.
動かしてみた
動かし方はSIFT版と全く同じです.
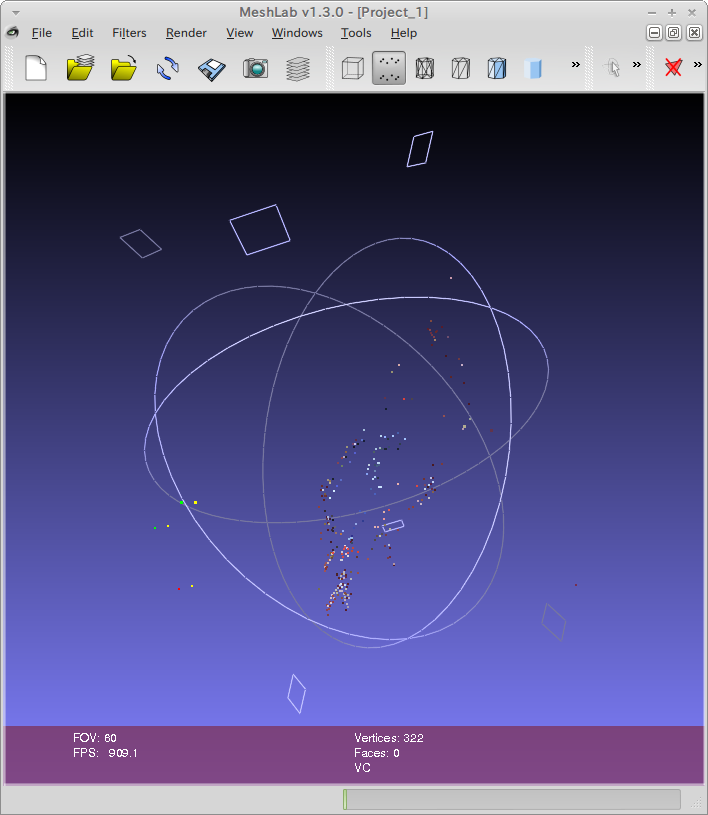
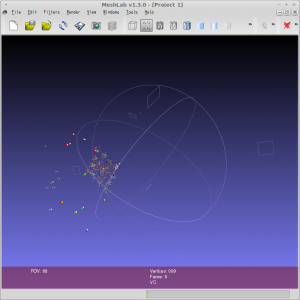
出力されたpoints019.plyが次のようなかんじ.
できてなくはないですがSIFTと比べると物足りないなぁ.
PMVSができなかった
PMVSを実行すると
 pmvs2 ./ pmvs_options.txt
 --------------------------------------------------
 --- Summary of specified options ---
 # of timages: 19 (range specification)
 # of oimages: 0 (not used)
 level: 1  csize: 2
 threshold: 0.7  wsize: 7
 minImageNum: 3  CPU: 8
 useVisData: 1  sequence: -1
 --------------------------------------------------
 Reading images: *******************
 0 1 2 Harris running ...3 6 Harris running ...4 Harris running ...5 Harris running ...7 Harris running ...Harris running ...Harris running ...Harris running ...182 harris done
 DoG running...163 harris done
 DoG running...200 harris done
 DoG running...168 harris done
 DoG running...182 harris done
 DoG running...319 dog done
 8 Harris running ...319 dog done192 harris done
 DoG running...188 harris done
 DoG running...
 9190 harris done
 DoG running...317 dog done
 10 Harris running ... Harris running ...191 harris done
 DoG running...320 dog done
 11 Harris running ...182 harris done
 DoG running...163 harris done
 DoG running...316 dog done
 12315 dog done
 13 Harris running ... Harris running ...184316 dog done
 14 Harris running ... harris done
 DoG running...318 dog done
 15 Harris running ...319 dog done
 16 Harris running ...317 dog done
 17 Harris running ...186 harris done
 DoG running...160 harris done
 DoG running...187 harris done
 319 dog done
 DoG running...18 Harris running ...161 harris done
 DoG running...319 dog done
 172 harris done
 186 harris done
 DoG running...DoG running...180 harris done
 DoG running...317 dog done
 314 dog done
 313 dog done
 317 dog done
 314 dog done
 319 dog done
 312 dog done
 done
 adding seeds
 (11,0)(14,0)(6,0)(16,0)(10,1)(4,0)(1,0)(7,0)(15,0)(8,1)((12,0)(3,1)5,0)(0,0)(18,0)(9,0)(17,0)(2,0)done
 ---- Initial: 0 secs ----
 Total pass fail0 fail1 refinepatch: 8756 3 8652 101 104
 Total pass fail0 fail1 refinepatch: 100 0.0342622 98.8122 1.15349 1.18776
 Expanding patches...
 ---- EXPANSION: 0 secs ----
 Total pass fail0 fail1 refinepatch: 22 1 12 9 10
 Total pass fail0 fail1 refinepatch: 100 4.54545 54.5455 40.9091 45.4545
 FilterOutside
 mainbody:
 Gain (ave/var): 0.253226 0.133944
 4 -> 4 (100%)   0 secs
 Filter Exact: *******************
 4 -> 4 (100%)   0 secs
 FilterNeighbor: 4 -> 0 (0%)     0 secs
 FilterGroups:   STATUS: 2 0 112 0 0 0 0 0 0 0
 0 0 0 0 0 0 0 0 0 0
 0 0 0 0 0 0 0 0 0 0
 0 0 0 0 0
 Expanding patches...
 ---- EXPANSION: 0 secs ----
 Total pass fail0 fail1 refinepatch: 0 0 0 0 0
 Total pass fail0 fail1 refinepatch: -nan -nan -nan -nan -nan
 FilterOutside
 mainbody:
 Gain (ave/var): 0 0
 0 -> 0 (-nan%)  0 secs
 Filter Exact: *******************
 0 -> 0 (-nan%)  0 secs
 FilterNeighbor: FilterGroups:   STATUS: 2 0 112 0 0 0 0 0 0 0
 0 0 0 0 0 0 0 0 0 0
 0 0 0 0 0 0 0 0 0 0
 0 0 0 0 0
 Expanding patches...
 ---- EXPANSION: 0 secs ----
 Total pass fail0 fail1 refinepatch: 0 0 0 0 0
 Total pass fail0 fail1 refinepatch: -nan -nan -nan -nan -nan
 FilterOutside
 mainbody:
 Gain (ave/var): 0 0
 0 -> 0 (-nan%)  0 secs
 Filter Exact: *******************
 0 -> 0 (-nan%)  0 secs
 FilterNeighbor: FilterGroups:   STATUS: 2 0 112 0 0 0 0 0 0 0
 0 0 0 0 0 0 0 0 0 0
 0 0 0 0 0 0 0 0 0 0
 0 0 0 0 0
 ---- Total: 0 secs ----
こんな出力がされて,結果が出ませんでした.
ちょっとぱっと見たところなんでかわからないです.
結果みると
bundlerの出力そのまま見てもSIFTと比べて特段綺麗ということはないですね.
印象レベルの話ですがKAZEの特徴検出はより顕著性の高いところにでる雰囲気なのですが,それもなんとなく見て取れます.
誤対応除去をした上での対応点数は画像ディレクトリにあるnmatches.ransac.txtに各画像間ごとに記述されています.
SIFTの場合は全部で6236の対応があり,KAZEの場合は2234の対応でした.
対応が少ないのかなぁ.
暫定まとめ
とりあえず,bundlerでKAZEを使うことはできました.
ですが,PMVSをかけるのに失敗したり対応点数が少なかったりと少し意外な結果に.
これはKAZEとSIFTのcompetitionというよりは,単におさかなさんの手抜き実装の問題と思われます.対応付けプログラムまでは作ったほうがいいと思いますので,このへんはto be continuedとさせてください.このままじゃ終われない…!
Hi!!
Thanks for trying KAZE features in Bundler.
I have already integrated successfully KAZE features in Bundler, so I can help you if you have any kind of problem.
Best Regards,
Pablo